Tired of seeing your walls turn into a canvas for your kids and want to know the best way to clean walls? Kids naturally love expressing their creativity everywhere, and walls often become their perfect canvas. But this creativity can cause a lot of headaches for parents when it comes to cleaning. So what are the issues people face? And what is the best way to clean walls? This guide aims to offer step by step answers.
What We Will Cover
Clean walls are essential for a beautiful and orderly home. However, they are always in the line of fire of crayons and pencils, especially if they are white or light-colored. It’s not just kids’ scribbles and stains that cause trouble; there’s also mold and moisture stains that need effective solutions. Knowing how to remove pencil and pen marks from walls can be precious skill. Plus, removing mold from walls is crucial to maintaining a healthy living environment.
In previous articles, we covered how to clean sofas, main small house bugs with photos, Cleaning with salt, and effective solutions to get rid of geckos. In this article, we’ll give you tried-and-true solutions for cleaning both white and colored walls effectively, while avoiding mistakes that could ruin the paint or cause other problems. Whether you’re looking to clean up drawings or tackle stubborn mold stains, we’ve got you covered.
GET IN TOUCH
Need Help From Professional Wall Cleaners In Riyadh?
Types of Kids’ Scribbles on Walls
Young children often find it hard to understand that drawing on walls isn’t acceptable. They see walls as a huge canvas to play with, unaware of the consequences. Kids aged 2 to 5 are most likely to scribble on walls as they start exploring their artistic abilities and using writing tools.
Common Scribbling Materials and Methods
Children use various tools to create their wall art, including:
- Crayons and Markers:
- Kids love markers for their bright colors and liquid ink.
- Cleaning marker scribbles ranges from medium to difficult, requiring special cleaners to remove the ink completely.
- Ballpoint Pen:
- These pens are common in regular writing.
- Cleaning ballpoint pen scribbles is tough, needing special chemicals like alcohol or dry erase cleaners.
- Pencils:
- Includes graphite pencils, wooden pencils, and colored pencils used for drawing.
- Removing pencil scribbles is easy, as you can use an eraser or a damp cloth.
- Kohl (Eyeliner):
- Leaving kohl within children’s reach can lead to wall scribbles.
- Cleaning kohl scribbles is somewhat challenging, requiring makeup removers or strong cleaners.
Tools and Materials Needed for Cleaning Walls
Before starting, gather the necessary tools and materials to ensure you get the best results without damaging your wall paint. Here’s a list of essential items:
- Special wall cleaners: These are gentle on paint but strong enough to remove tough stains and scribbles.
- Soft cloths or sponges: Use these to scrub and clean the walls gently without scratching the paint.
- Warm water: Helps dilute cleaners and makes it easier to remove stains and scribbles.
- Baking soda: Can be used as a gentle scrub to remove tough stains without damaging the paint.
- Vinegar.
Now that you have your tools ready, it’s time to learn the practical steps.
6 Steps to Clean Scribbles off Walls
After gathering the necessary cleaning tools, it’s time to learn the practical steps for removing tough stains and scribbles from your walls. The following tips ensure effective and safe cleaning, regardless of your wall paint type, without damaging the paint or leaving unwanted marks.
Step 1: Identify the Type of Scribbles
Identifying the material your child used on the wall is crucial in the cleaning process. Each material has its own properties that require specific cleaning methods.
Why Identifying Scribbles is Important:
- It helps you choose the most effective method to remove them without damaging the paint.
- Using inappropriate materials can worsen the problem or damage the paint.
- Choosing the right method from the start saves you time and effort in the cleaning process.
How to Identify Scribbles:
- Visual Inspection: Examine the scribbles closely, noting their color and texture. Are they shiny or matte? Greasy or dry?
- Simple Test: Wet a cotton swab with water and rub a small section of the scribble. If the color transfers to the swab, it’s likely from crayons or markers. If not, it might be ballpoint pen or pencil marks.
- Ask the Child: If unsure, ask your child what tool they used.
Step 2: Dry Dusting to Remove Dust and Debris
After identifying the scribbles, remove accumulated dust and dirt from the wall. This step might seem simple, but it prevents dirt from mixing with cleaners.
Importance of Dry Dusting:
- Removing dust before wet cleaning prevents spreading dirt and small particles on the wall surface, making scribble removal easier.
- It allows the cleaner to reach stains and scribbles more effectively, enhancing its efficiency.
- Eliminating rough particles and dust before using a sponge or cloth reduces the risk of scratching the wall.
How to Dry Dust:
- Choose a microfiber or soft cotton cloth and ensure it’s completely clean.
- Start from the top and work your way down with gentle, even strokes. Avoid pressing hard to prevent scratching the wall.
- If the wall is heavily dusty, repeat the dry dusting process until all dust and debris are removed.
Step 3: Mix Cleaner with Warm Water
After dust removal, prepare the cleaning solution by mixing the chosen product with a suitable amount of warm water.
Why Mixing Cleaner with Warm Water is Important:
- Warm water activates the cleaner’s components, increasing its effectiveness in dissolving stains and scribbles.
- It makes the sponge or cloth glide more smoothly on the wall, easing the cleaning process and reducing friction.
- Using a diluted solution minimizes the risk of paint damage or leaving unwanted residues.
How to Mix Cleaner with Warm Water:
- Choose a suitable container for the amount of solution needed for cleaning the wall.
- Avoid very hot water to prevent paint damage. The water should be comfortably warm.
- Add a small amount of wall cleaner to the warm water. Follow the cleaner’s instructions for the right amount.
- Use a spoon or stirring tool to mix the cleaner and water until well combined.
Step 4: Test the Mixture on a Small Wall Section
Before cleaning the entire wall, ensure the solution won’t damage the paint or leave unwanted marks. Wall paint can be sensitive to some chemicals or strong cleaners.
Why Testing the Mixture is Important:
- It ensures the solution won’t cause fading or discoloration, peeling, or damage to the paint.
- You might find that the solution isn’t suitable for your wall paint, allowing you to adjust or choose another cleaner before it’s too late.
- Testing helps avoid the risk of having to repaint the wall due to damage from an unsuitable cleaner.
How to Test the Mixture:
- Find a small, hidden area of the wall, such as behind a sofa or in a corner.
- Dampen a soft, clean cloth with the cleaning solution.
- Gently wipe the chosen area with the damp cloth.
- Let the solution sit on the wall for a few minutes until it dries.
- Carefully inspect the area. If you notice any changes, choose another cleaner or dilute the solution with more water. If no changes are observed, proceed to clean the entire wall.
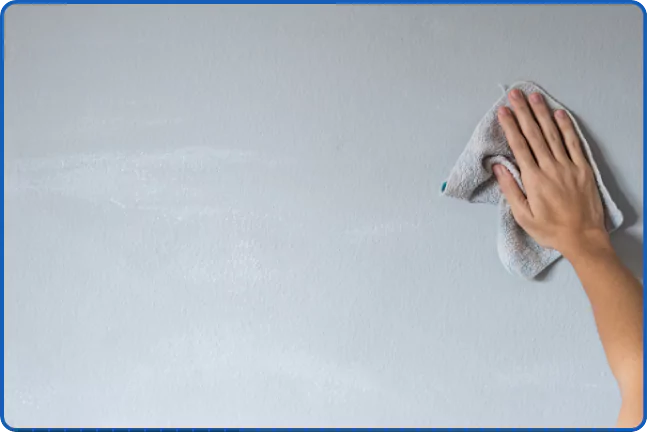
Step 5: Clean with the Mixture and Sponge
After confirming the cleaning solution is safe, use a sponge to remove the annoying scribbles. This step is the most satisfying as you watch the scribbles disappear before your eyes.
How to Clean with the Mixture and Sponge:
- Dip the sponge in the prepared cleaning solution.
- Squeeze the sponge well to remove excess water. The sponge should be damp but not soaking wet.
- Start cleaning the scribbles with gentle circular motions. Avoid pressing hard to prevent scratching the paint.
- For particularly dirty areas, focus on them and repeat the cleaning process until the stains are completely gone.
- Regularly rinse the sponge with clean water to remove dirt and scribbles.
- Continue cleaning the wall until all scribbles are gone and you are satisfied with the result.
Step 6: Rinse and Dry
After successfully removing the scribbles, finalize the cleaning process by rinsing with water.
Why Rinsing and Drying is Important:
- Even gentle cleaners can leave residues on the wall if not rinsed well. These residues can attract dust and dirt, making the wall look dirty again quickly.
- Drying the wall after rinsing prevents water spots that could damage or discolor the paint.
- Proper rinsing and drying ensure the wall is completely clean and free from any wet residues that could damage or dirty it in the future.
How to Rinse and Dry:
- Fill a container with room-temperature clean water.
- Dampen a clean, soft cloth with the water.
- Squeeze the cloth well to remove excess water. The cloth should be damp but not soaking wet.
- Wipe the entire wall with the damp cloth to remove any cleaner residues. Start from the top and move down with gentle, even strokes.
- Use a clean, dry cloth to wipe the wall and dry it thoroughly. You can use a soft cotton towel or a microfiber cloth.
How to Clean Walls with Vinegar
Did you know that white vinegar is not just a kitchen staple but also a powerful and effective natural cleaner for walls? Vinegar has unique properties that make it an ideal choice for cleaning walls and removing tough scribbles and stains.
Benefits of Using Vinegar to Clean Walls:
- Dissolves Stains: Vinegar helps dissolve accumulated stains and dirt on walls, including scribbles and ink marks, thanks to its acetic acid content, which effectively breaks down tough, greasy stains and mineral deposits.
- Natural Disinfectant: Vinegar acts as a natural disinfectant, its antimicrobial properties kill harmful germs.
- Safe and Non-Toxic: Vinegar is a natural and safe cleaner for use around children and pets, without harmful chemicals.
- Affordable: Vinegar is available in almost every home and is cost-effective compared to commercial cleaners.
- Versatile: Vinegar works well with other cleaners like baking soda and natural oils, enhancing its cleaning effectiveness.
Steps to Clean Walls with Vinegar:
- Mix Solution: Combine one cup of white vinegar with one liter of warm water in a bucket.
- Prepare Sponge: Dip a soft sponge or clean cloth into the solution and wring it out well.
- Wipe Walls: Start wiping the wall from top to bottom in gentle circular motions. Focus on dirty or scribbled areas.
- Tough Stains: For stubborn stains, leave the solution on the wall for a few minutes before wiping.
- Rinse: Dampen a clean cloth with clean water and wipe the wall to remove vinegar residue.
- Dry: Use a dry cloth to wipe the wall completely dry.
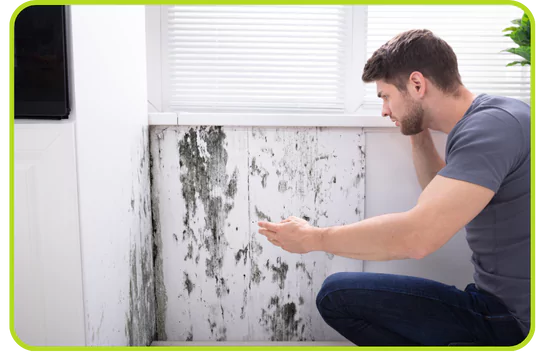
How to Remove Mold Stains from Walls
Mold and mildew stains caused by moisture are common problems that affect the beauty and health of walls. Mold can cause health issues like allergies and asthma and damage clothes and curtains, in addition to aesthetic damage. Here are detailed steps to effectively remove these stains:
Materials and Tools Needed:
- White vinegar
- Warm water
- Baking soda
- Anti-mold household cleaner
- Soft brush
- Rubber gloves
- Face mask
- Soft cloth or sponge
Steps to Remove Mold and Mildew Stains:
- Prepare the Area:
- Cover the floor and furniture near the walls with plastic or old cloths to protect them from dirt and water.
- Wear rubber gloves and a face mask to protect yourself from germs and mold.
- Improve Ventilation:
- Open windows and doors to improve room ventilation. Fresh air can help reduce moisture and prevent mold from growing again.
- Remove Surface Mold:
- Use a dry cloth or soft brush to gently remove surface mold and mildew. Ensure you dispose of these materials far from your home.
- Prepare Cleaning Solution:
- Mix one part white vinegar with two parts warm water in a container. You can also add a teaspoon of baking soda to increase cleaning effectiveness.
- Apply Cleaning Solution:
- Dampen a cloth or sponge in the vinegar and water solution, then gently scrub the walls in circular motions, focusing on heavily affected areas.
- Rinse and Dry:
- After cleaning the walls, rinse the area with clean water to remove any remaining cleaner. Use a clean cloth to dry the walls thoroughly.
- Treat Stubborn Stains:
- For stubborn mold stains, you can mix a paste of baking soda and water and apply it directly to the stains. Leave the paste for 10-15 minutes, then scrub gently with a soft brush and rinse with water.
- Repeat if Necessary:
- You may need to repeat the process several times for the best results, especially if the stains are stubborn.
- Prevent Mold Reoccurrence:
- After cleaning the walls, ensure you address the source of moisture in your home. Use dehumidifiers if moisture is a persistent problem. Fix any leaks in pipes or the roof, and ensure bathrooms and kitchens are well ventilated.
Choosing Wall Cleaners in Saudi Arabia
Choosing the right wall cleaner can be confusing with the many options available in the market. Leveraging our expertise, we provide a comprehensive guide to help you select the best cleaner for your needs and keep your walls looking beautiful.
Factors to Consider When Choosing Wall Cleaners
- Wall Type: Is your wall painted, wallpapered, or made of another material? Is it semi-gloss or matte? Ensure you choose a cleaner suitable for your wall type to avoid damage.
- Stain Type: Are you dealing with scribbles, greasy stains, mold, or just dirt and dust? Each stain type requires a specific cleaner formulation.
- Product Safety: Ensure the cleaner is safe to use around children and pets and does not contain harmful chemicals.
- Ease of Use: Choose a cleaner that is easy to apply and does not require much effort and time.
- Price: Compare the prices of different cleaners and select the one that offers the best value for money.
Top 5 Wall Cleaners in Saudi Arabia and Where to Buy Them
- Magic Eraser:
- Benefits: Excellent for removing scribbles and tough stains using melamine sponge technology without harsh chemicals.
- Availability: Found in major supermarkets like Carrefour and Panda, or online on Noon and Amazon.
- Scotch-Brite Heavy Duty Scrub Sponge:
- Benefits: High cleaning power with a rough layer to remove stubborn dirt without scratching.
- Availability: Available in home goods stores and supermarkets, and online on Amazon and Noon.
- Method All-Purpose Cleaner:
- Benefits: An eco-friendly and safe cleaner with a natural and effective formula.
- Availability: Found in major supermarkets and home goods stores, and online on Amazon.
- Dettol Multi-Use:
- Benefits: A strong disinfectant that kills 99.9% of germs and bacteria, safe for various surfaces around the home.
- Availability: Available in any supermarket or grocery store, and online on Amazon and Noon.
- Goof Off Cleaner:
- Benefits: A powerful stain remover for sticky residues, wax, paint, ink, grease, and more.
- Availability: Found in home goods stores and supermarkets, or online on Amazon and Noon.
DIY Wall Cleaner Recipes
If you prefer using natural and safe cleaners, you can make them at home with simple and readily available ingredients:
- Vinegar and Water Solution: Mix one cup of white vinegar with one liter of warm water. Use this solution to wipe walls and remove light dirt and stains.
- Baking Soda Paste: Mix a small amount of baking soda with water to form a thick paste. Use this paste to scrub tough stains, such as scribbles and ink marks.
- Lemon and Water Solution: Mix the juice of one lemon with one liter of warm water. Use this solution to clean walls and remove unpleasant odors.
How Cleaning White Walls Differs from Other Types of Walls
White walls are elegant and stylish but require special care compared to colored walls. Here are the key differences:
White Walls:
- Visibility of Stains: Even the smallest spots and dirt are highly visible, requiring more frequent cleaning to maintain a clean appearance.
- Gentle Cleaners: Harsh cleaners can damage or discolor white paint, so it’s essential to use mild cleaners or home cleaning solutions like water and vinegar.
- Frequent Cleaning: White walls need regular cleaning to prevent dirt and stains from accumulating.
- Gentle Scrubbing: Avoid harsh scrubbing. Use a soft sponge or cloth to prevent leaving marks or scratches.
- Thorough Drying: Ensure white walls are well dried after cleaning to prevent water stains and moisture marks.
Colored Walls:
- Concealment of Stains: Stains and dirt are less visible on colored walls.
- Stronger Cleaners: You can use relatively stronger cleaners on colored walls without worrying about damaging the paint.
- No Yellowing Issue: Colored walls don’t suffer from the yellowing that can affect white walls.
Steps and Specifics for Cleaning Walls Painted with Plastic Paint
Plastic paint is a type of water-based paint known for its ease of use, quick drying time, and smooth, durable surface that’s easy to clean. It differs from oil-based paints, which are shinier, harder, take longer to dry, and are more challenging to clean.
Steps to Clean Walls Painted with Plastic Paint:
- Protect Furniture and Floors: Cover furniture and the floor with cloths or plastic sheets to avoid getting them dirty before starting the cleaning process.
- Dust Removal: Use a soft broom or dry cloth to remove dust and dirt from the wall.
- Prepare Cleaning Solution: You can use warm water with a bit of dish soap or a solution of one part white vinegar to three parts warm water.
- Test Cleaning Solution: Test the cleaning solution on a small, inconspicuous part of the wall to ensure it doesn’t damage the paint.
- Gentle Cleaning: Dampen a soft sponge or cloth with the solution and wipe the wall in gentle circular motions. Avoid using abrasive brushes or scrubbing tools that might damage the paint.
- Rinse with Clean Water: After cleaning, rinse the area with clean water to remove any remaining cleaner. Use a clean cloth dampened with water to wipe the wall, then dry it with a clean cloth.
Specifics of Cleaning Plastic Painted Walls
- Avoid Abrasive Materials: Don’t use abrasive materials or rough brushes to clean plastic-painted walls, as they may scratch the surface.
- Soft Cloths and Sponges: Always use a soft cloth or sponge to avoid scratching the paint.
- Avoid Strong Scrubbing: Don’t scrub the wall too hard, as it may damage the paint.
- Immediate Stain Removal: Try to clean stains immediately as they are easier to remove when fresh.
Differences Between Plastic Paint and Other Paints:
- Stain Resistance: Plastic paint is stain-resistant and easy to clean with soap and water, while oil-based paints may require stronger cleaners and can leave stains.
- Quick Drying: Plastic paint dries quickly compared to oil-based paints, making it suitable for spaces that need to be used quickly.
- Variety of Finishes: Plastic paint offers a variety of colors and finishes and is less prone to cracking or peeling compared to oil-based paints.
How to Remove Grease Stains from Walls
Grease stains on walls can be annoying and affect the aesthetic and cleanliness of your home. These stains are common in kitchens and areas near cooking zones. Here are detailed steps to effectively remove grease stains:
Materials and Tools Needed:
- Dish soap
- Warm water
- White vinegar
- Baking soda
- Soft sponge
- Soft brush
- Soft cloth
- Dry towel
- Rubber gloves
Steps to Remove Grease Stains:
- Prepare the Area:
- Wear rubber gloves to protect your hands from chemicals and greasy materials.
- Cover the floor and nearby furniture with plastic sheets or old cloths to protect them from water and cleaners.
- Remove Surface Grease:
- Use a dry cloth or paper towel to wipe off as much surface grease as possible. Dispose of the cloth or towel safely.
- Prepare Cleaning Solution:
- Mix a teaspoon of dish soap with a cup of warm water in a container.
- Apply Cleaning Solution:
- Dampen a soft sponge in the cleaning solution and wipe the walls in gentle circular motions, focusing on greasy areas.
- Use Baking Soda for Stubborn Stains:
- If there are stubborn grease stains, mix a teaspoon of baking soda with a bit of water to form a paste. Apply the paste to the stains and leave it for 10-15 minutes. Then scrub the area gently with a soft brush or sponge.
- Use White Vinegar:
- For tougher grease, mix one part white vinegar with two parts warm water in a spray bottle. Spray the solution on the stains and leave it for a few minutes, then scrub the area with a soft sponge.
- Rinse the Walls:
- Rinse the area with clean water to remove any remaining cleaners. Use a cloth dampened with clean water to wipe the walls gently.
- Dry the Walls:
- Use a dry towel to thoroughly dry the walls. Ensure you remove any moisture to prevent water stains.
- Repeat if Necessary:
- You may need to repeat the process several times for the best results, especially if the stains are old and stubborn.
- Prevent Future Grease Buildup:
- To keep walls clean and grease-free, regularly clean the walls near cooking areas using dish soap and warm water. Consider using removable and washable protective covers for walls near cooking zones.
Frequently Asked Questions
Is Removing Ballpoint Pen Ink from Walls Difficult? Can I Clean It with Toothpaste?
Removing ballpoint pen ink from walls can be a bit challenging, but you can achieve satisfactory results with the right materials and tools. Follow these steps:
- Gather Materials: You will need white toothpaste, a soft cloth, and warm water.
- Apply Toothpaste: Put a small amount of toothpaste directly on the ink stain.
- Scrub Gently: Use the soft cloth to scrub the toothpaste gently on the ink in circular motions.
- Rinse: Dampen the cloth with warm water and wipe the area to remove the toothpaste and ink residue.
- Repeat if Necessary: Repeat the process if the stain is large or stubborn.
How Do I Remove Tea and Coffee Stains from Walls?
Tea and coffee stains can leave noticeable marks on walls, but they can be removed easily by following these steps:
- Prepare Materials: You will need white vinegar, warm water, a soft sponge, and a dry towel.
- Mix Solution: Mix one part white vinegar with two parts warm water in a container.
- Apply Solution: Dampen the sponge in the solution and wring out excess liquid.
- Scrub the Stain: Gently scrub the stain with the sponge in circular motions.
- Rinse the Area: Use a towel dampened with warm water to rinse the area and remove the cleaning
